
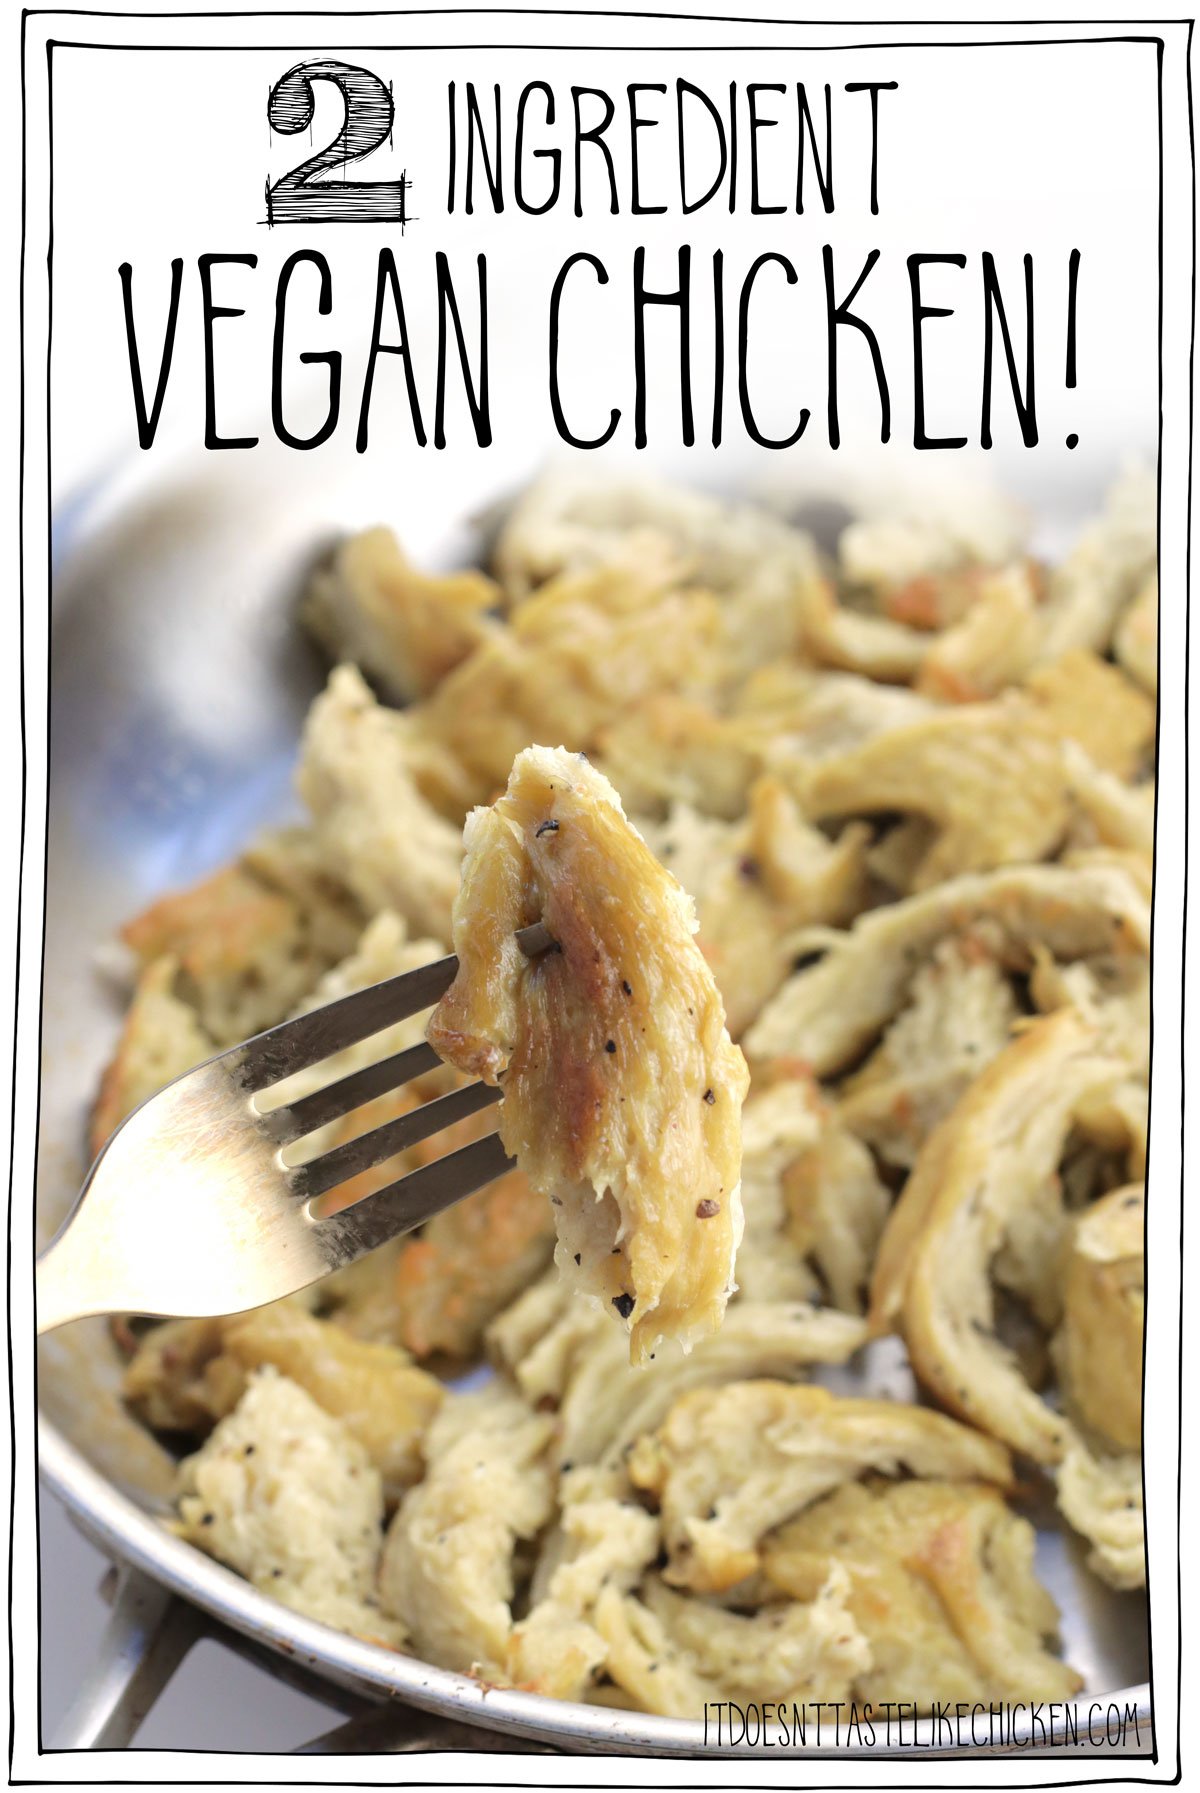
This 2-Ingredient vegan seitan "chicken" is so chewy and juicy. The washed flour seitan pulls apart into shreds that are perfect for adding to any dishes like pastas, stews, sandwiches, salads, stir-fry's, and more!
Have you have seen the viral TikTok trend of making this washed flour seitan? Although this technique may be new to some, making seitan in this way is actually a historic technique that has been documented in China since the 6th century, most commonly consumed by Buddhist monks! The process of washing the flour separates the starch from the gluten (wheat protein) which makes for an incredibly meaty and delicious 2-ingredient vegan chicken! So cool!
Nowadays you can buy vital wheat gluten (the wheat protein) which allows you to skip the washing the dough process. But for me, curiosity piqued when I saw these TikTok videos and I knew I had to give this ancient technique a try myself.
My goodness, I'm sure glad I did, because making 2 ingredient vegan chicken is fun and although it's a bit time-consuming, each step is actually pretty easy! And the results are SO worth it. This is the most chicken-y vegan chicken I have ever tasted!! Washed flour seitan is chewy and juicy. The seitan pulls apart into shreds that are perfect for snacking on alone, or you can add them to practically any dish- pasta, sandwiches, salads, soups, wherever you like!
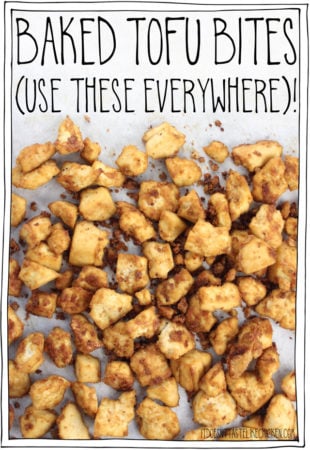
I don't blame you if you aren't interested in this long process, and if that's the case, try making my vegan seitan tenders or (even easier) my baked tofu bites. Both recipes are perfect vegan chicken subs. But if you are feeling up for it, then you're in for a treat! The process is enjoyable and the washed flour seitan is so so so worth it!
How to Make Seitan Chicken:
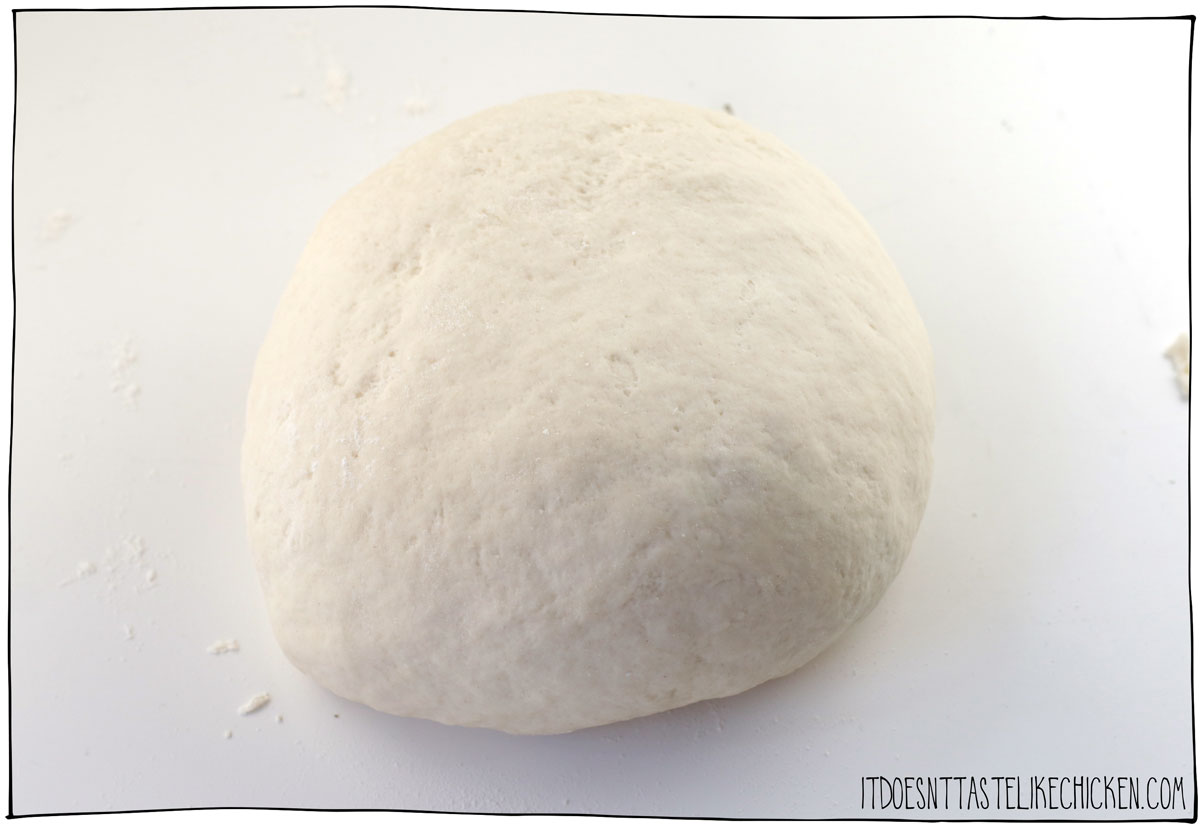
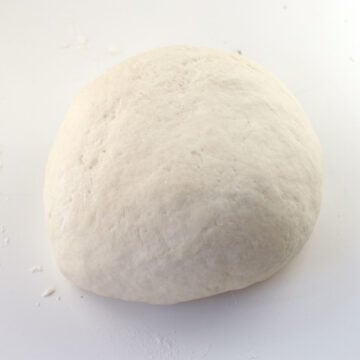
Make the Dough Ball (10 minutes active work):
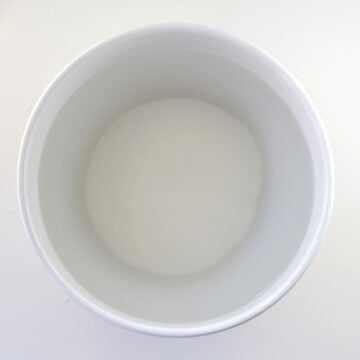
Mix the flour and water together in a large bowl to make a shaggy dough. Using your hands begin kneading the dough in the bowl until it forms a ball. Dump the dough out onto a clean work surface and knead the ball of dough well for 5 - 8 minutes. If the dough is too sticky, sprinkle the dough with flour as needed. Alternatively, if you have a mixer with a dough hook you can use this to knead the dough.
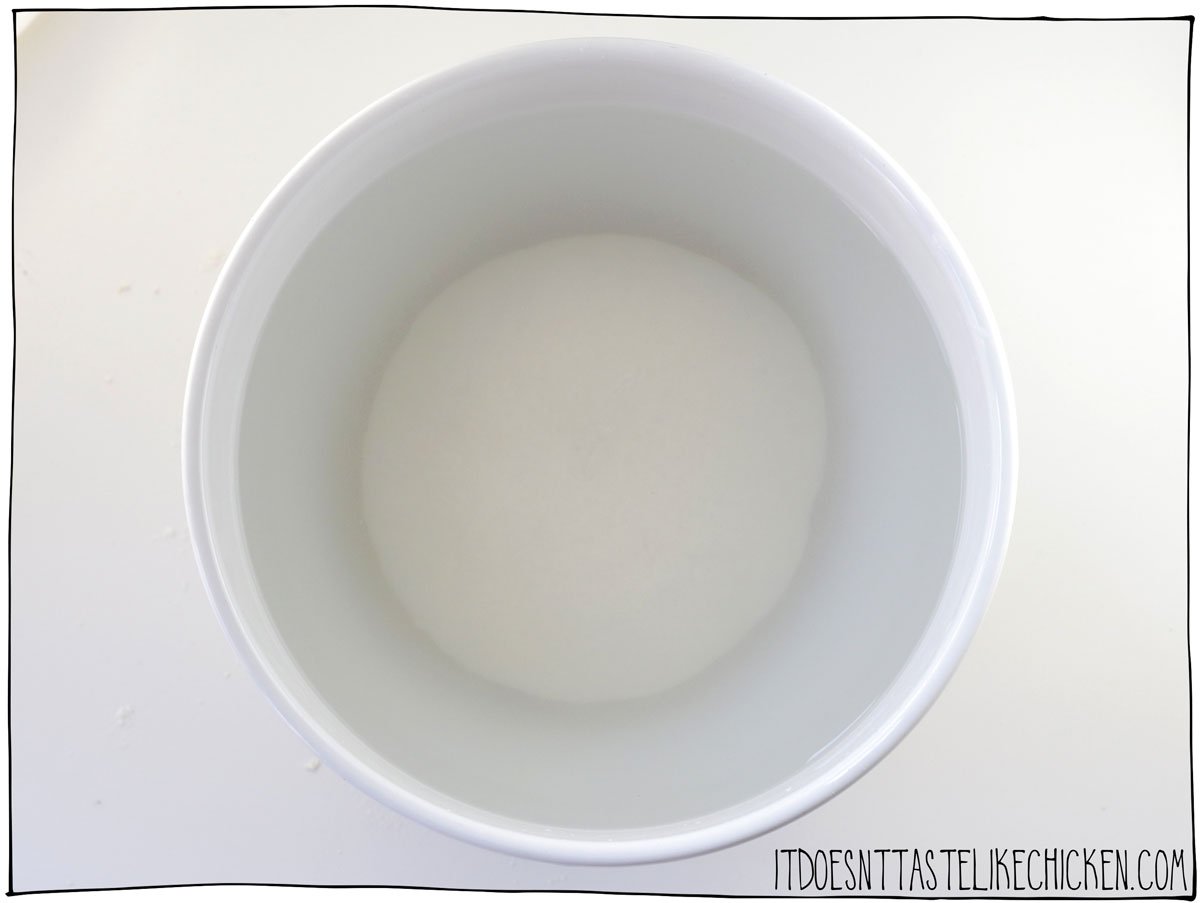
Soak the Dough (1 - 2 hours hands-off):
Put the kneaded dough ball in a large clean bowl and cover it with cool water. Let rest in the water for 1 - 2 hours or overnight.
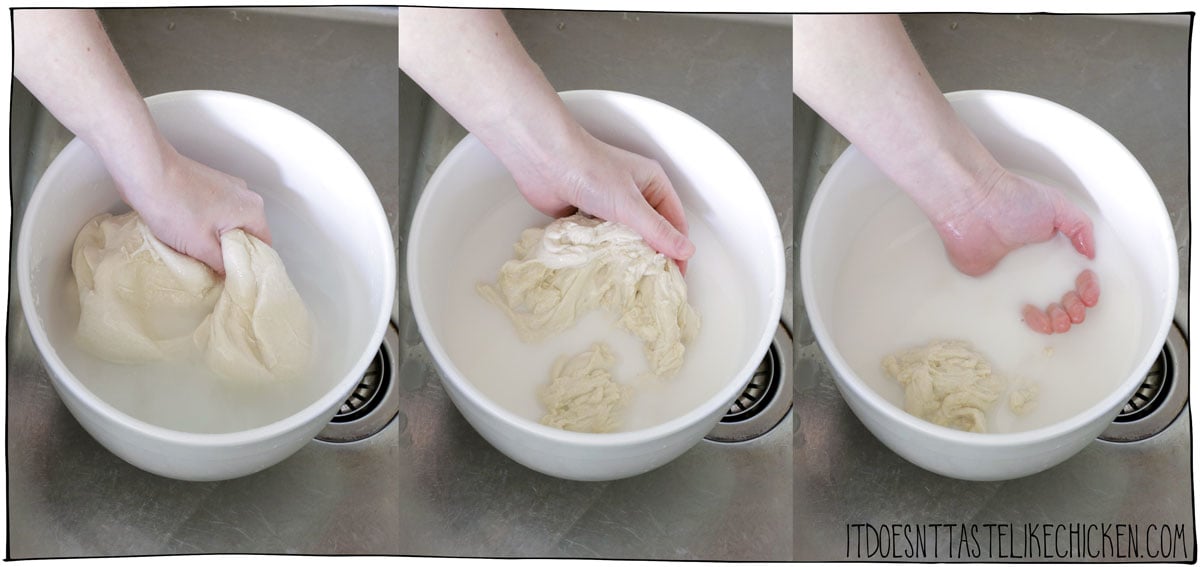
Wash the Dough (15 - 20 minutes active work):
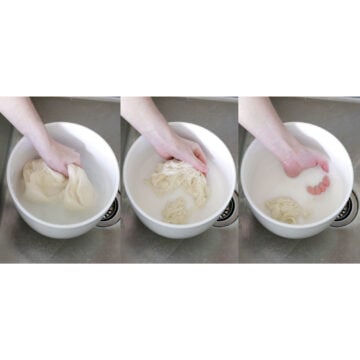
Wash 1: drain the water off of the dough ball, then cover the dough with fresh room temperature water. Squeeze the dough under the water, squishing it between your fingers. The dough will be tough at first but will quickly soften and feel slimy. Continue squishing the dough until the water for 3 - 5 minutes is opaque thick milky white, this is the starch separating from the gluten. Drain off the starchy water. You can either discard the water or save it to use to make vegan bacon!
Saving the starchy water: let the water sit overnight. The starch and water will separate. You will see the yellow water on top, and the white starch which will sink to the bottom. Pour off and discard the water leaving behind just the starch. Store the starch in an air-tight container in the fridge for up to a week or it can be frozen to use later.
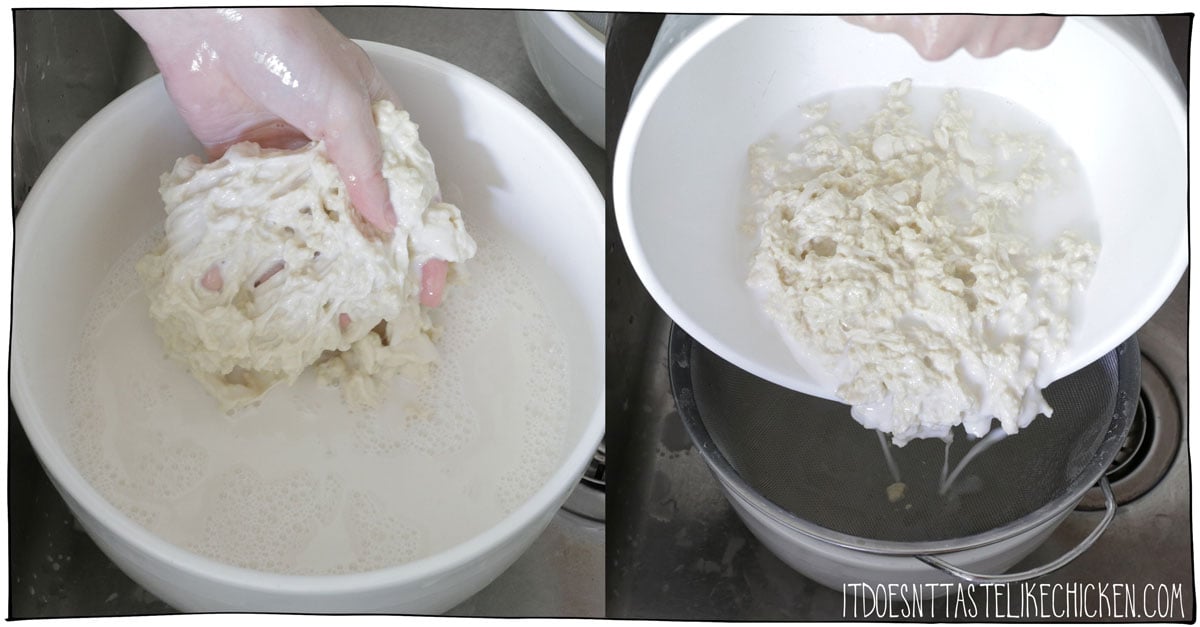
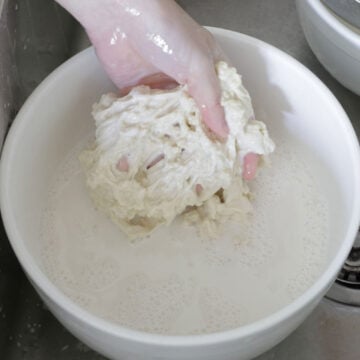
Washes 2 - 3: repeat the process of squeezing the dough underwater, squishing it, and kneading it for several minutes before changing the water. The dough will start to fall apart into clumps, this is a good thing! Drain the starchy water, using a strainer to catch any bits of gluten dough. Note: I save the starchy water from the first 3 washes but do not save the rest of the water from the washes as there will not be much starch.
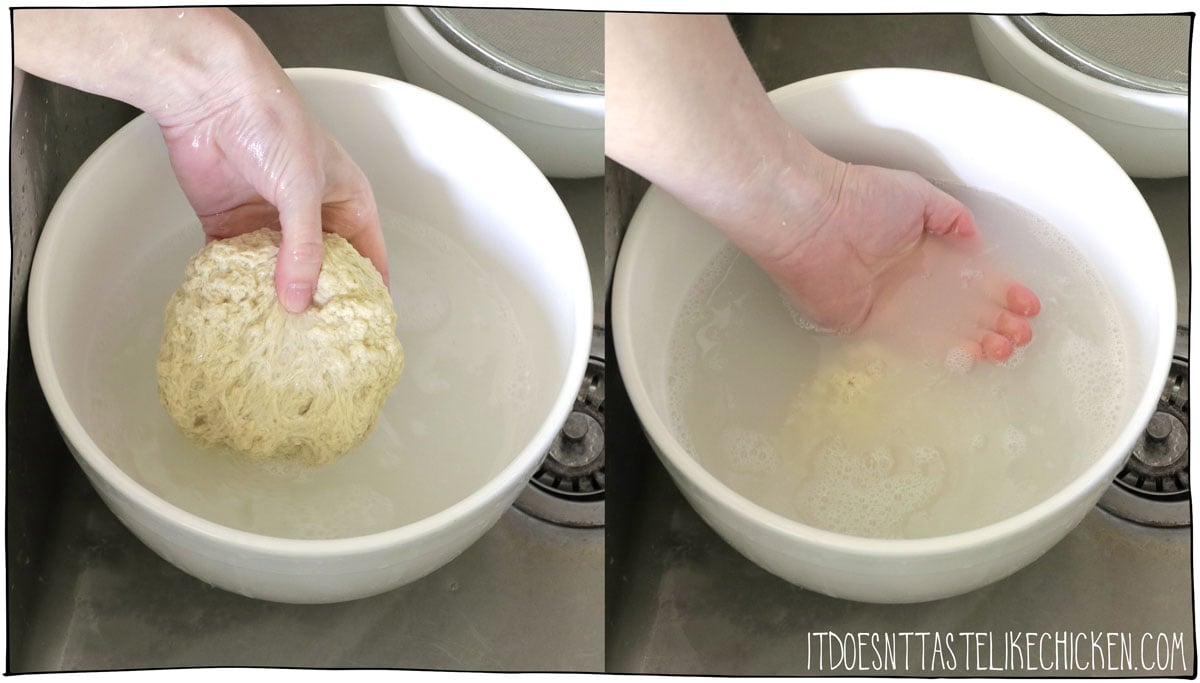
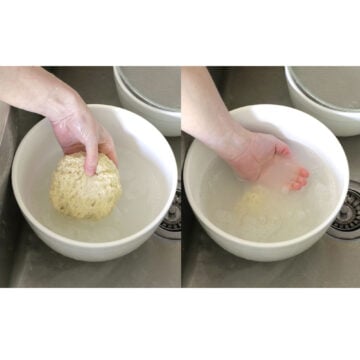
Washes 4 -5: keep repeating this process and the dough will start to come together again. The dough will be the texture of soft chewing gum and will be beige in colour. When you reach this stage, and the water becomes mostly clear you are done washing! Let the dough rest in a strainer for 10-20 minutes while you prepare your simmering broth.

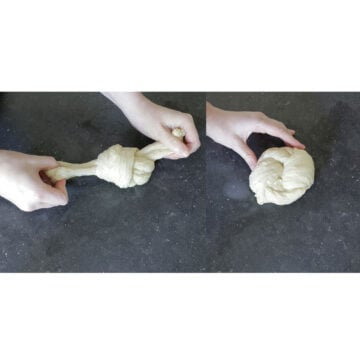
Braid and Knot the Dough (5 minutes active work):
After the dough has rested for 10 - 20 minutes, gently stretch the dough into a long rectangle. Use a pair of scissors or a knife to cut the dough lengthwise into three strands leaving the top attached. Braid the dough, gently stretching it as you go. Tuck the loose ends into the braid.
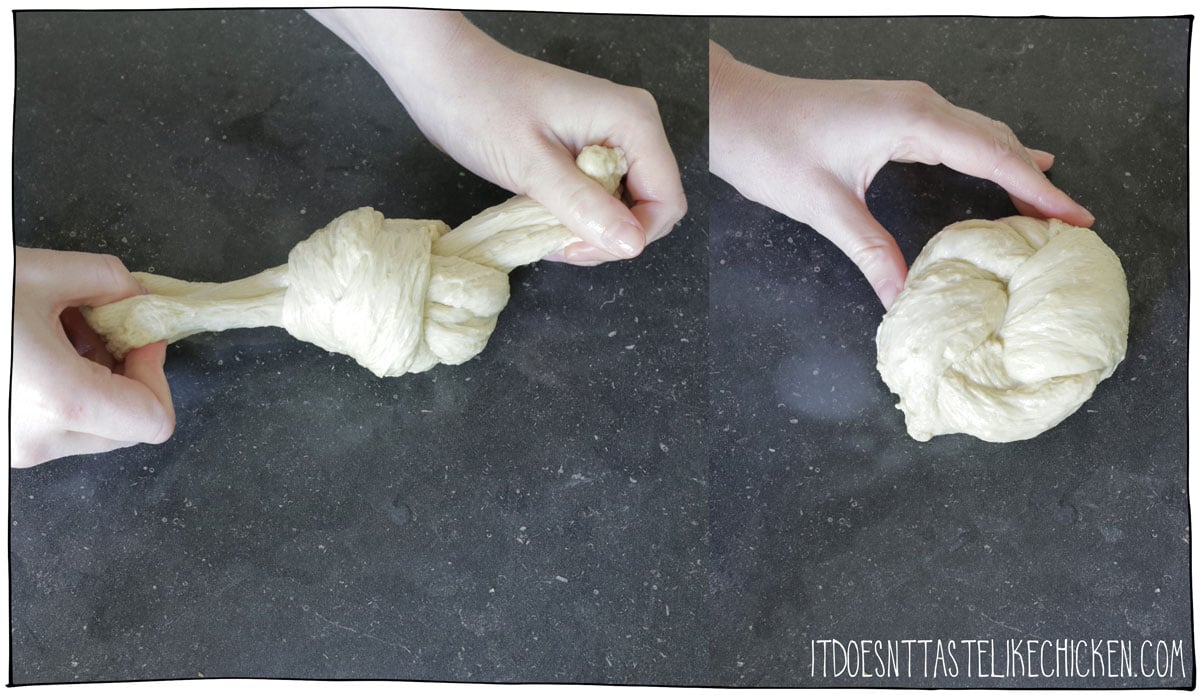
Gently stretch the braid and then tie it into 1 - 2 knots, tucking in any loose ends. Stretching, braiding, and knotting the dough will give the dough long stringy textures that mimic the muscle fiber texture of chicken.
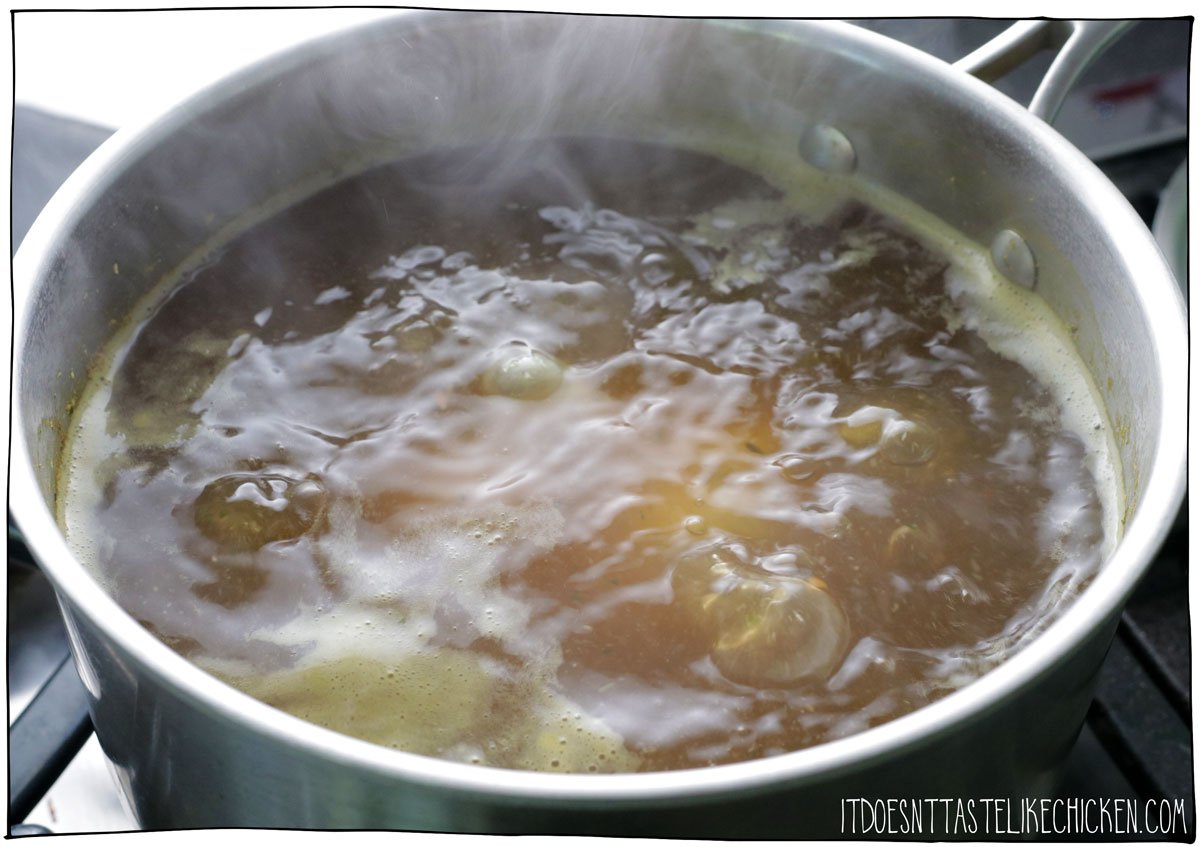
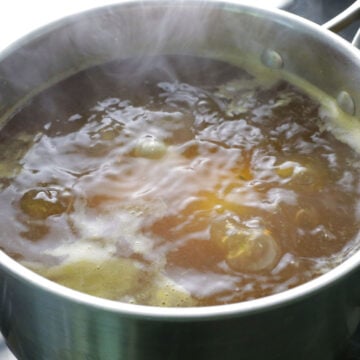
Simmer the Dough (1 hour hands-off):
Add the vegetable broth, soy sauce, onion powder, and garlic powder to a medium pot and bring to a gentle simmer. Add the dough ball and gently simmer the dough for about 1 hour, flipping the dough halfway through.
Cool the Dough (1 hour - overnight hands-off):
Allow the dough to cool in the broth. I like to cool it overnight in the fridge but if you're in a pinch, you can add some ice to the broth to encourage it to cool faster.
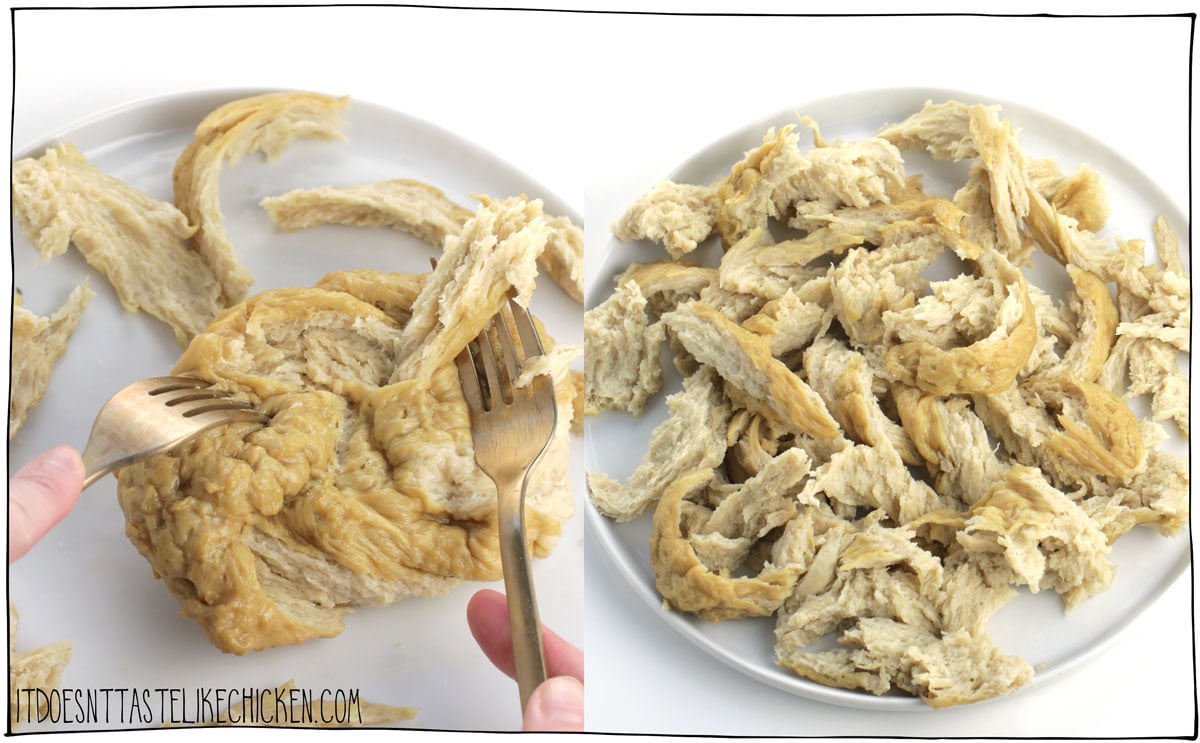
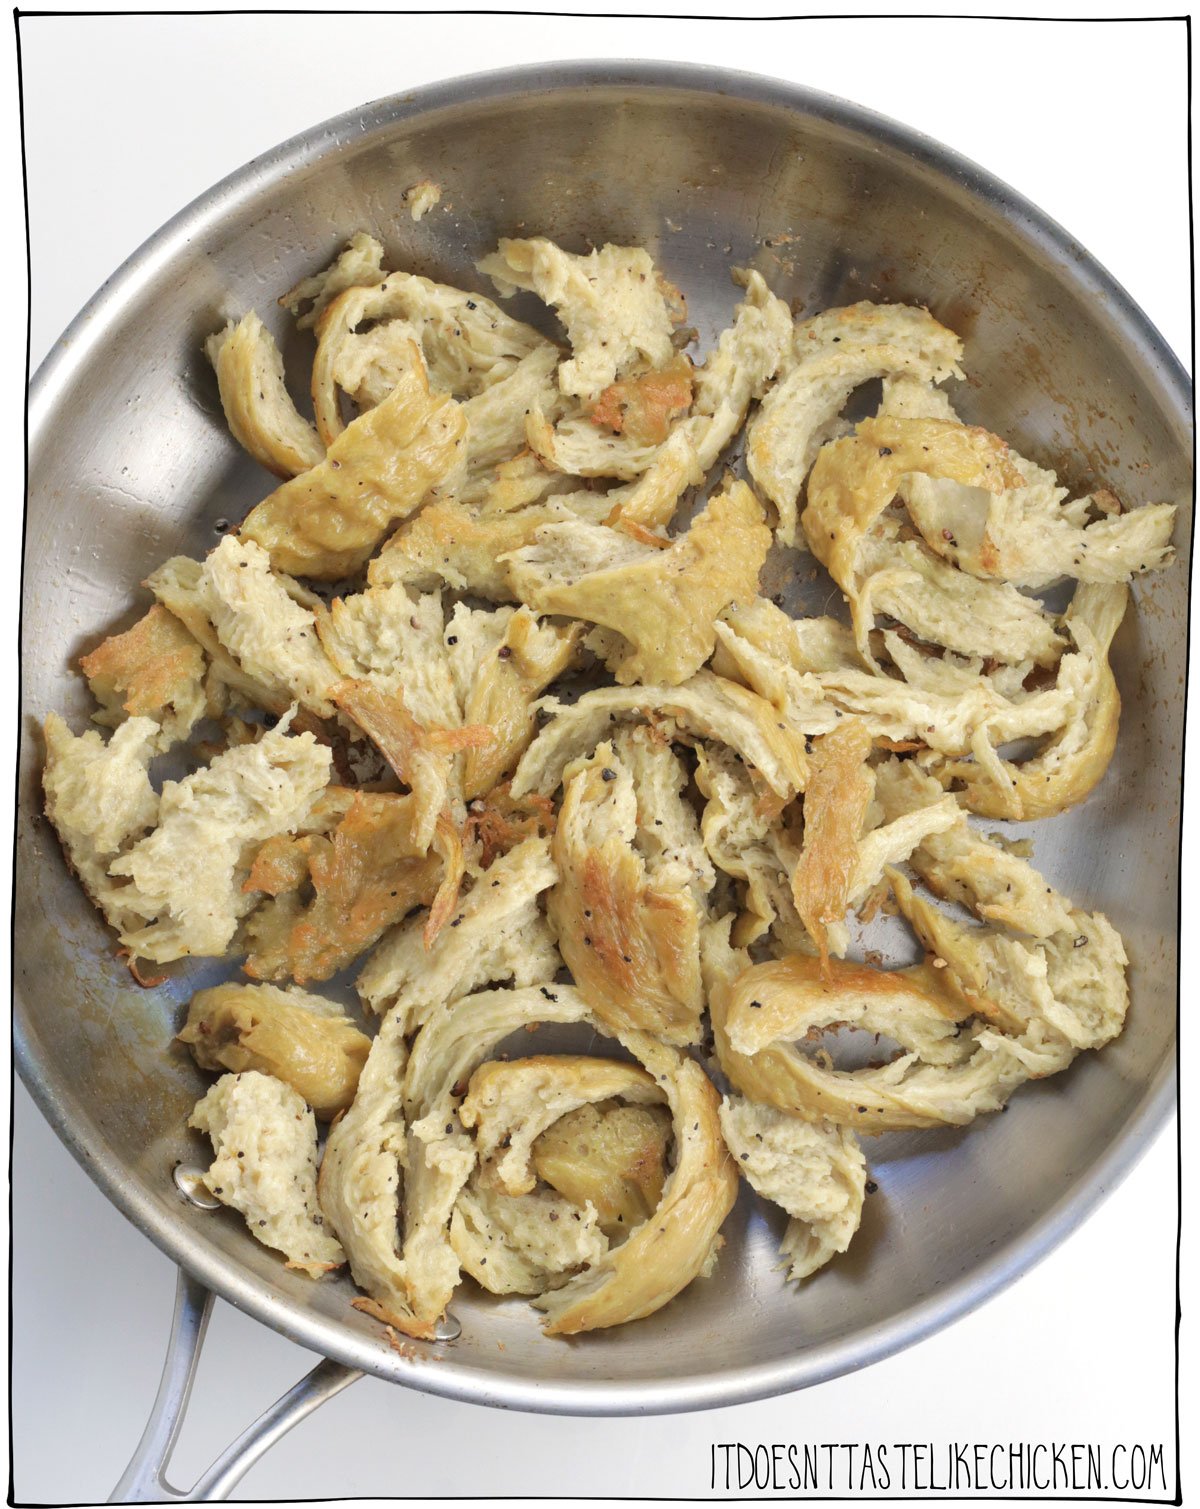
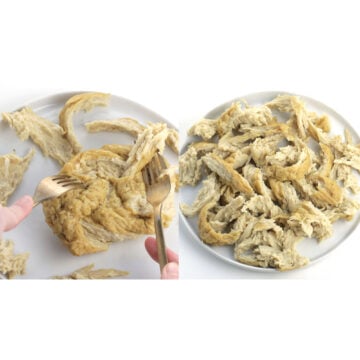
Shred the Vegan Chicken (5 minutes active work):
Use two forks, or your fingers to pull the 2 ingredient vegan chicken apart into shreds. Follow the grain of the dough to get the best shreds. Now you can enjoy the vegan chicken cold, or heat it up and add it to any dish you desire.
I like to fry my vegan chicken shreds in a bit of oil and season generously with salt and pepper. If making ahead of time, shred the chicken and store it in the leftover broth. It will keep well in the fridge for 5 - 7 days or it can be frozen.
Some Common Questions:
What is Seitan made of?
Seitan is made from gluten. Gluten is the protein which gives dough a stretchy, springy texture. When starch is removed from dough so that only the gluten is left that is seitan.
Can Seitan be made gluten-free?
Unfortunately no. Seitan is made directly from gluten.
Bon appetegan!
Sam Turnbull.
(click stars to vote)
2 Ingredient Vegan Chicken!
Servings: (makes about 2 cups shredded vegan chicken)
PRINT
PIN
COMMENT
Ingredients
For the vegan chicken:
- 4 cups all-purpose flour
- 1 ¾ cups water
For the vegetable broth simmer (feel free to season as you prefer):
- 6 cups vegetable broth
- 2 tablespoons soy sauce
- 2 teaspoons onion powder
- 1 teaspoon garlic powder
Instructions
Make the dough ball (10 minutes active work)
- Mix the flour and water together in a large bowl to make a shaggy dough. Using your hands begin kneading the dough in the bowl until it forms a ball. Dump the dough out onto a clean work surface and knead the ball of dough well for 5 - 8 minutes. If the dough is too sticky, sprinkle the dough with flour as needed. Alternatively, if you have a mixer with a dough hook you can use this to knead the dough.

Soak the dough (1 - 2 hours hands-off)
- Put the kneaded dough ball in a large clean bowl and cover it with cool water. Let rest in the water for 1 - 2 hours or overnight.
Wash the dough (15 - 20 minutes active work)
- Wash 1: drain the water off of the dough ball, then cover the dough with fresh room temperature water. Squeeze the dough under the water, squishing it between your fingers. The dough will be tough at first but will quickly soften and feel slimy. Continue squishing the dough for 3 - 5 minutes until the water is opaque thick milky white, this is the starch separating from the gluten. Drain off the starchy water. You can either discard the water or save it to use to make vegan bacon!Saving the starchy water: let the water sit overnight. The starch and water will separate. You will see the yellow water on top, and the white starch which will sink to the bottom. Pour off and discard the water leaving behind just the starch. Store the starch in an air-tight container in the fridge for up to a week or it can be frozen to use later.
- Washes 2 - 3: repeat the process of squeezing the dough underwater, squishing it and kneading it for several minutes before changing the water. The dough will start to fall apart into clumps, this is a good thing! Drain the starchy water, using a strainer to catch any bits of gluten dough. Note: I save the starchy water from the first 3 washes but do not save the rest of the water from the washes as there will not be much starch.
- Washes 4 -5: keep repeating this process and the dough will start to come together again. The dough will be the texture of soft chewing gum and will be beige in colour. When you reach this stage, and the water becomes mostly clear you are done washing! Let the dough rest in a strainer for 10-20 minutes while you prepare your simmering broth.
Braid and knot the dough (5 minutes active work)
- After the dough has rested for 10 - 20 minutes, gently stretch the dough into a long rectangle. Use a pair of scissors or a knife to cut the dough lengthwise into three strands leaving the top attached. Braid the dough, gently stretching it as you go. Tuck the loose ends into the braid. Gently stretch the braid and then tie it into 1 - 2 knots, tucking in any loose ends. Stretching, braiding, and knotting the dough will give the dough long stringy textures that mimic the muscle fiber texture of chicken.
Simmer the dough (1 hour hands-off)
- Add the vegetable broth, soy sauce, onion powder, and garlic powder to a medium pot and bring to a gentle simmer. Add the dough ball and gently simmer the dough for about 1 hour, flipping the dough halfway through.
Cool the dough (1 hour - overnight hands-off)
- Allow the dough to cool in the broth. I like to cool it overnight in the fridge but if you're in a pinch, you can add some ice to the broth to encourage it to cool faster.
Shred the vegan chicken (5 minutes active work)
- Use two forks, or your fingers to pull the vegan chicken apart into shreds. Follow the grain of the dough to get the best shreds. Now you can enjoy the vegan chicken cold, or heat it up and add it to any dish you desire. I like to fry my vegan chicken shreds in a bit of oil and season generously with salt and pepper. If making ahead of time, shred the chicken and store it in the leftover broth. It will keep well in the fridge for 5 - 7 days or it can be frozen.
Notes
Nutrition


Jen says
LOVE this recipe!! Makes my week day meals super easy and quick. One thing, can you use a stand mixer to do the washes? I have tendinitis in my wrist so the kneading starts to make it painful around washes #3.
Debbie says
Time-consuming, yes, but it's fun to make and turns out really well. it's a practical staple to have on hand for so many dishes. I love adding it to stir fry, salad, sandwiches, etc.
Laura says
I can't get the ball to be stretchy like gum after washing (even after washing several more rounds just to be sure). What am I doing wrong? It's very spongey and cannot be pulled apart much without breaking.
Sam Turnbull @ It Doesn't Taste Like Chicken says
Hi Laura, It sounds like there might still be some starch left in your dough, which could be causing the issue. To help with this, try kneading the dough more thoroughly during the washing process. You can knead it for several minutes in the water until it becomes very cloudy with starch before refreshing the water. Keep repeating this until the water is almost completely clear, which indicates you've successfully removed most of the starch. This should help make your seitan dough stretchy and less spongey. Keep going, and you'll get there!
Jackie says
Makes a great Seiten, but the Metric measurements are incorrect!
Hi! So I've used this recipe in the past to make Seiten and used to convert the US imperial measurements to metric myself. So I can confidenctly say, when given the correct measurements this is a great recipe!
However I haven't made it in a while, opened my bookmark to find there is actually Metric measurements built into the recipe, so I used those this time and it was a complete disaster. I checked the ratio between the Imperial and Metric measurements and sadly the imperial one is just under 2:1 (4 cups to 1 and 3/4 water) whereas the metric is nearly 1:1! (500g of flour to 414g of water) I did wonder why the dough was so soggy and why I had to keep adding so much more flour to make it a dough ball!
Unfortunately for me the end result dissolved horrendously and now I'm just left with a starchy soggy flour paste that's clogging up my sink 🙁
Please can you fix the metric measurements so this doesn't happen again? Thank you!
Sam Turnbull @ It Doesn't Taste Like Chicken says
Hi Jackie! Thank you so much for this feedback and sorry for the mess up! We use a program to convert everything to metric, and I guess it must have messed up here. I checked again and it should be correct now. 480g flour and 420ml water. I hope that helps!
Terry Martin says
Freaking awesome!
Sam Turnbull @ It Doesn't Taste Like Chicken says
So happy you enjoyed it Terry!
Kerrie says
Has anyone done the simmering in a slow cooker? Would that work?
Sam Turnbull @ It Doesn't Taste Like Chicken says
I haven't tried it, but it should definitly work fine. Just ensure it cooked all the way through. Enjoy!
Jenna Moreira says
Love this recipe so much! One question- I find when I make it, the volume before and after the washing durastically (I made a double batch so I started 960g of flour but after washing it’s only 560g). Is this to be expected or am I not doing something correctly (longer kneading needed!)
Either way I love this recipe! Thank you!
Sam Turnbull @ It Doesn't Taste Like Chicken says
Yes that's correct Jenna, you are removing the starch so that is the weight difference you are seeing. You can use the leftover starch to make starch bacon so there is no waste. I hope that helps!
Donna says
This is a question. I can't rate this recipe because I haven't made it yet (although I'm making my first batch today). I have been using tofu as my main meat substitute for over 2 years now, but it seems my husband has developed a real intolerance for it, so I'm looking for good seitan recipes.
My question... will white whole wheat flour work for this recipe???
Connie says
Yes. I’ve used white unleashed flour or we flour interchangeably for many years
Sam Turnbull @ It Doesn't Taste Like Chicken says
Hi Donna, apologies for the delay. Yes it will work but it might result in a slightly denser and darker seitan compared to using regular all-purpose flour. The bran and germ in whole wheat flour can also affect the texture slightly, making it a bit more fibrous. But if you're okay with a heartier texture, it should work just fine! If you're interested in learning more about seitan I recommend checking out my free masterclass here.
Simone Rogers says
Totally love this recipe and have made it many times!
Each time the end result is slightly different which is testament to a fully hand made product (sometimes I’m strong, sometimes I’m less strong!)
By far the best seitan recipe I’ve tried.
Thanks so much Sam.
Brilliant!
Jess @ IDTLC Support says
Wonderful! We're so happy to hear it!
Tracy says
This recipe has one major flaw...it doesn't make enough! I was intimidated by WTF method, but your step by step tutorial made it easy. Without the tutorial I would have thought I had messed it up for sure at a couple of points (like when the gluten starts to clump and fall apart!). It turned out amazing! Even just this simple recipe as is made a great chicken sandwich. One of my favorites before going vegan was a simple roasted chicken sandwich with mayo. This is even better! Plus there are so many possibilities...on to making bacon with the starch water!
Jess @ IDTLC Support says
We love hearing about everyone's experiences. Thanks for sharing yours, Tracy! Sorry it doesn't make enough. Ha!
Amz says
Hi
I tried making this and have loved the process. One thing though is that my seitan still tastes very watery, I’ve tried frying it off to dry it out a bit. Do you have any other suggestions?
A
Sam Turnbull says
By tastes watery do you mean that it is soggy and spongey? If so make sure you knead it until it is the texture of chewing gum. Stretch it and tie it into tight knots. This will help it from expanding and absorbing too much broth. You could also try wrapping it tightly in cheesecloth before simmering to help it not expand and take on too much water. I hope that helps!
Sara says
THIS RECIPE SUCKS. I mixed the all purpose flour and water, as directed. The result was not even close to the consistency of dough - instead, it was so watery I could mix it with a spoon. I sprinkled in bit more flour...and then some more, and some more, and some more. I eventually started scooping handfuls out of the bag. By the time I had something the texture of dough I'd added easily another 1-2 cups of flour. I kneaded it, then put in in a bowl of water overnight.
Rinsing went even worse than the first step had. I'm not sure if this was because the dough had still been fairly sticky and soft when I put it in to soak, or if it was because I rinsed too much and needed to knead more; either way, it went quickly downhill. The bowl of gloop got soupier and soupier. I tried to strain it and the stretchy bits gummed up the strainer so much the water wouldn't drain. I finally threw in the towel and dumped the whole bowl down the drain, and then found a new problem - the strainer was IMPOSSIBLE to clean. I spent 10 minutes scrubbing it with a stiff brush and it's still gummed up. Ive got half a mind to take it outside and use the pressure washer.
If I only ran into problems rinsing it, I'd chock this all up as incompetence on my part - but the fact that the ingredient ratios made no sense from the beginning makes me think that someone just tossed this recipe up on the internet for clicks and ad revenue without actually trying it themselves. Do yourself a favor and find a recipe somewhere else.
Ariko says
I’m in the process of making this right now. Worked just fine for me. The dough shouldn’t be sticky or wet at all before you cover it with water. If it’s still sticky as you’re kneading it, you’ve gotta add flour until it’s not sticky. I probably added on another cup. Kneading it also develops the gluten. So if you don’t knead it enough, it’s still sticky to the touch, and you still put on in cold water, that’s where you messed up. If you’d still like to make it, I’d say try again and make sure the dough is well-worked and not sticky before you rest it in water.
Wilma says
Can you use this braid method in the seitan tenders recipe? Instead of putting in steamer cut up into strips and braid and then simmer like this? Or woudl the vital gluten (starch is already removed like you're tryign to do here) become tough? Just thinking it could be faster than the wash method.
Megan Streb says
I'm wondering the same! I've managed to get a good price for lots of vital wheat gluten so don't really want to faff around with washing flour, but like the idea of it being flakier.
Eliza says
Hey, I was just wondering if you happen to know how to go about freezing the chicken and up to how long you would recommend it be frozen for?
Thanks very much
Sam Turnbull says
Yes, seitan freezes very well and it should keep for up to 6 months. Enjoy!
Ben says
Love this method; just wanted to ask how you calculated the calories / how reliable they are for tracking?
Would be handy to be able to safely make this as part of my weight loss plan 😀
Sam Turnbull says
Hi Ben, so happy you loved it! When I write my recipes I use a nutrition calculator that is built into the recipe writing program. It's pretty accurate (depending on the brands of products you use). However, for this recipe it was difficult to calculate because it is just flour but the starch is removed. So the nutrition here is a guess, based on the nutrition of vital wheat gluten (which is basically what the recipe is). I hope that makes sense!
Laurie says
I made the chicken today. The instructions are very clear. Thankyou! I turned half into bbq chicken over rice. The other half I will make a stir fry tomorrow.
Everything went exactly as you said. I had very few little bits. I saved the starch water and can't wait to try the bacon. I also saved the broth for soup.
With everything so costly these days it is wonderful to get 3 different meals from one cost.
Thankyou!
Karen Lindstrom says
Can I wash wheat gluten flour? My Seitan never look’s stringy like that. I checked and my gluten is 23g of protein and 4 grams of carbs. Would it help to wash out the little bit of carbohydrate starch?
Sam Turnbull says
I have never tried that. If you give it a whirl let us know how it goes!
Jo Dufay says
Very happy I made this. It's really delicious, far better than any commercially available "vegetarian chicken" I've ever tried, and some of those commercial products have highly processed ingredients that I'd rather avoid.
The process has its ups and downs, though. First of all - it's fun, very tactile, like making play-dough!
Secondly, after the first washing, the whole thing was just a kind of porridge-like consistency - hard to pour the water off because it was all mixed together. I tried a colander (holes too big) and a sieve (took a long time to pass through). However, have faith, because by the second wash it starts to come together, and from the third wash it's a loose bolus. You still have to strain it through a sieve at the end, though.
And this was the worst bit - picking all the bits of dough off the sieve afterwards. It's like chewing gum, stuck in all the teeny-tiny sieve holes. Soaking didn't help much, it was just half an hour of pick, pick, pick. (If anyone has a remedy for this, please let me know!)
The last part - boiling the knotted dough in broth was a surprise, the relatively small bundle of dough swelled up into a giant ball. Amazing.
And the taste and texture of the finished product are really, really good. I haven't cooked with it yet, but even before incorporating into a dish, it's delicious. The roller coaster was worth it!
Sam Turnbull says
So happy you enjoyed, Jo!
Jo Dufay says
Thanks Sam. Wonder if you have experienced the difficult-to-clean sieve problem I described, and if you have any solutions?
Ang says
Hi Jo, try a metal steamer insert instead - I have one that sits inside a large pan (not the folding kind) that has smaller holes than a colander, but is much easier than a sieve.
Wayne Blizzard says
Sam: I'm really looking forward to trying this one out! BTW, I know the nutritional info is estimated, but looking at various websites listing nutritional content of wheat flours, the protein content per serving (from 1 cup of flour) is probably between 7 - 11 grams, not 45 g (which is a value I've seen for 4 cups of flour).
Marianne says
I get 13g of protein per cup that's 52g for 4 cups.
Christine Stabile says
When I placed the dough after washing into the broth it did puff up alot and became like a cloud. It doesn't look like it should to shred it, am I doing something wrong?
Melissa says
I think I did something wrong. It feels like soggy, salt bread. any ideas?
I love the process and how unprocessed the protein is. will try again. Any tips of my error welcome.
Ciara says
Wish someone answered you! I came to the comments for troubleshooting tips. My dough didn't want to come back together very easily, and then when I tried braiding it, it fell apart a bit... so I ended up just kneading and squishing it together and threw it in the pot anyway! we'll see what happens when it's done...
Skye says
How do I go about adding this as a recipe into My Fitness Pal so I can track the protein, carbs into my meals. Is there a way to calculate the nutritional value based on which type of flour I use? Not sure how to figure out how to break it down the grams based on the one ingredient.
Sam Turnbull says
Hi Skye, I believe you can add recipes to my nutrition pal?